


- About
- Programs
- Campus Life
- Career Services
- Admissions
- News & Events
- Alumni
- Anton Mosimann


How to Make a Roux: Types, Ratios and Expert Tips
Learn how to make a roux for perfect sauces and gravies. Discover types, ratios, and tips—then try it in your next recipe!

Key Takeaways
- Roux changes in both flavor and function as it cooks, moving from strong thickening power to deeper, more developed taste.
- The ratio of fat to flour stays consistent, but heat control and timing determine the final result.
- Different types of roux suit different dishes, from delicate sauces to rich, slow-cooked stews.
- Making roux ahead and storing it properly can save time without sacrificing quality.
Some of the most recognizable dishes in cooking, which include béchamel, gravy, or gumbo, rely on the same technique that helps achieve that silky sauce—the roux. This simple mixture of fat and flour builds structure, texture, and depth in everything from creamy soups to rich stews.
Roux might seem simple at first glance, but it demands technique and attention. A few extra minutes can shift it from pale and neutral to dark and intensely aromatic, changing how it thickens and how it tastes. That range is what makes it so useful across different styles of cooking.
This guide breaks down how to control that process. You'll learn how each type of roux develops, how to adjust it for different dishes, how to store it for later use, and how to refine your technique. A gluten-free option is also included, so the method can be adapted without losing consistency.
How to Make Roux: Four Main Types
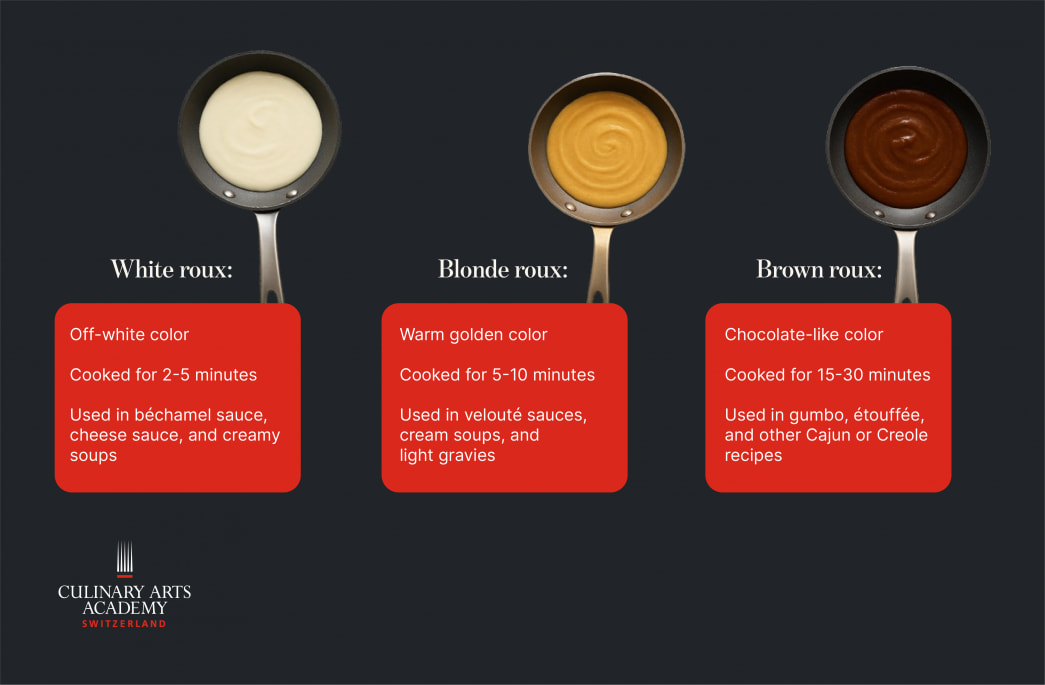
One way to differentiate the types of roux is by their color: white roux is pale, blond roux is golden, and brown roux is dark and rich. The main factor behind these differences is cooking time—the longer a roux cooks, the darker it becomes. This change in color also affects flavor and thickening power: lighter roux thickens more effectively, while darker roux adds deeper, nuttier flavors but with less thickening strength.
To make a basic roux, you only need two ingredients: flour and fat. All-purpose flour is the standard, but you can use gluten-free or whole-wheat alternatives if needed. The typical ratio is 1:1 by weight, though you can adjust slightly depending on how thick you want your final dish.
Tools you'll need to make roux include:
- Heavy-bottomed pan or skillet (non-stick or cast iron recommended)
- Whisk or wooden spoon (for continuous stirring)
- Measuring scale or cups
- Heat-resistant spatula (optional, but handy for scraping edges)
White roux
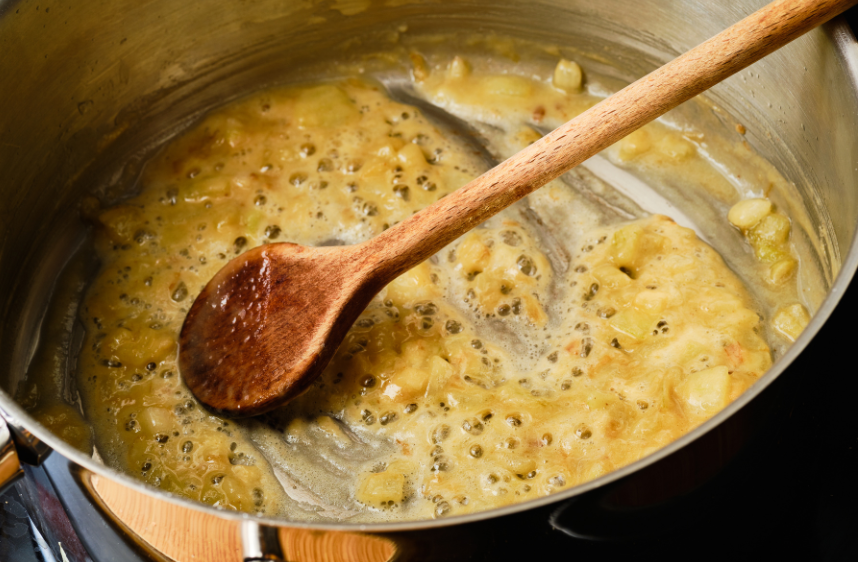
White roux is the lightest version, cooked just long enough to remove the raw taste of flour. It stays pale and offers the strongest thickening ability, making it ideal for smooth, delicate sauces.
To make white roux:
- Heat butter in a heavy-bottomed pan over medium heat.
- Add an equal amount of flour by weight and stir continuously.
- Cook for 2 to 5 minutes until the mixture thickens and bubbles.
- Keep the color pale and avoid any browning.
Start Your Culinary Journey
Learn the art of cooking in a world-class environment

Blonde roux
Blonde roux cooks slightly longer, developing a soft golden color and a mild nutty aroma. It balances thickening ability with a bit more flavor.
To make blonde roux:
- Melt butter in a pan over medium heat.
- Add flour in equal proportion and stir constantly.
- Cook for 5 to 10 minutes until it turns light golden.
- Watch closely, as the color deepens quickly at this stage.
Brown roux
Brown roux takes on a deeper tone, similar to peanut butter or light caramel. The flavor becomes richer and more toasted, while the thickening power starts to decrease.
It works well in brown sauces, espagnole, and hearty stews where flavor matters more than structure.
To make brown roux:
- Heat oil or butter in a heavy pan over medium-low heat.
- Add flour in equal parts and stir continuously.
- Cook for 10 to 20 minutes until it reaches a medium brown color.
- Keep the texture smooth and avoid rushing the heat.
Dark roux
Dark roux is the most developed stage, reaching a deep brown to near-black color, similar to dark chocolate. At this point, it contributes very little thickening but delivers intense, layered flavor. It is used in gumbo, étouffée, and Cajun or Creole cooking, where depth and color define the dish.
To make dark roux:
- Heat oil in a heavy pan over low heat.
- Add flour in equal proportion and stir constantly.
- Cook for 30 to 45 minutes, sometimes longer for traditional preparations.
- Maintain low heat and continuous movement, as it burns easily at this stage.
Popular Recipes That Use Roux
Roux is one of the most versatile bases in cooking, quietly working behind the scenes to give body, texture, and depth to many dishes. From French classics to Southern comfort food, roux serves as the foundation for recipes across different cuisines. Depending on how long it's cooked, roux can support everything from delicate, creamy sauces to rich, hearty stews.


Here are a few popular recipes that use roux:
- Béchamel sauce: A white sauce made with white roux and milk. It is one of the five French "mother sauces" and forms the base for dishes like lasagna, soufflés, and creamy gratins.
- Gumbo: A flavorful Louisiana stew made with dark brown roux, vegetables, and either seafood or meat. The roux gives it its signature thickness and deep, smoky flavor.
- Macaroni and cheese: Starts with a white roux that becomes the base for a rich cheese sauce. This classic comfort food is smooth, creamy, and always a crowd-pleaser.
- Etouffée: A Cajun or Creole dish that uses a medium to dark roux. It is typically made with shellfish, like crawfish or shrimp, and served over rice with a deeply savory sauce.
How to Store Roux
Roux can be stored in the refrigerator for short-term use or frozen for longer storage. Here's how to keep it fresh and ready when you need it:
Refrigerating roux
Storing roux in the refrigerator is a great option if you plan to use it within the next few weeks. Once it has cooled to room temperature, follow these steps:
- Use the right container: Choose a glass jar with a tight-fitting lid or a BPA-free plastic container. Avoid using metal containers, as they can react with the roux and affect its taste.
- Label and date: Always label the container with the date you made the roux. This helps you keep track of freshness.
- Store properly: Place the container on a middle or lower fridge shelf where the temperature is more stable.
Roux stored in the fridge will last up to 2 to 4 weeks. Before using, let it soften at room temperature for easier stirring, then reheat gently in a pan. It's perfect for quick recipes like:
- Cheese sauces
- Creamy soups
- Weeknight gravies or pan sauces

Freezing roux
For long-term storage, freezing roux is a smart way to save time in future cooking. All types—white, blond, or brown roux—can be frozen for up to 6 months.
- Portion it for convenience: Pour warm (not hot) roux into silicone ice cube trays, small silicone molds, or even mini muffin tins.
- Freeze solid: Place the tray in the freezer until the roux is completely frozen, which usually takes a few hours.
- Transfer and label: Pop the roux cubes out and store them in a freezer-safe bag or airtight container. Label with the roux type and date.


When you're ready to use frozen roux, simply drop a cube directly into a hot soup, stew, or sauce and whisk until it melts and blends in smoothly. It's an easy way to jumpstart dishes like gumbo, mac and cheese, or creamy pasta sauces.
Frozen roux is especially helpful for large-batch cooking or meal prep. You'll always have a flavorful base ready to go.
Common Mistakes to Avoid When Making Roux
Making roux is simple, but a few missteps can throw off the texture, flavor, or consistency of your entire dish. Here are some of the most common mistakes and how to avoid them:
Burning the roux
Roux requires constant attention. Burning usually happens when the heat is too high, or you stop stirring, even for a moment. Once a roux burns, it takes on a bitter, unpleasant taste and can't be saved. You'll need to start over.
So, always cook it over medium or medium-low heat and stir continuously to keep it from sticking or scorching.


Adding liquid too soon
It's tempting to speed things up, but adding liquid before the roux has cooked enough results in a raw, chalky flavor that lingers in your dish.
Let the mixture cook until it reaches the desired color and gives off a slightly nutty or toasty aroma, depending on the type of roux you're making.
Using the wrong fat or flour
Butter and all-purpose flour are the go-to combination but are not the only option. If you're using oil instead of butter when making a roux, pick one with a high smoke point, like vegetable, canola, or avocado oil, especially for darker roux that requires longer cooking. For gluten-free alternatives, avoid single flours like almond or coconut, which can create grainy or uneven textures.
Chef-Approved Tips for a Flawless Roux
Some chef-approved tips that you should keep in mind in order to achieve a flawless roux are:
- Heat control matters more than speed, so keep the temperature steady rather than trying to rush the process.
- A heavy-bottomed pan distributes heat evenly and reduces the risk of hot spots.
- Your sense of smell becomes a reliable guide, helping you recognize when the roux has reached the right stage.
- Measuring ingredients by weight gives more consistent results than relying on volume.
- Stirring should remain continuous, even when the mixture seems stable.
Start Making Roux Like a Pro
From creamy white sauces to bold, flavorful gumbos, roux is a foundational technique every aspiring chef should know. Roux is more than just flour and fat; it is the base of countless classic recipes across cultures. By understanding the different types of roux, how to cook them properly, and how to store them for future use, you gain a versatile skill that can advance your cooking to a new level.
To master techniques like this and build a strong culinary foundation, the Culinary Arts BA program at Culinary Arts Academy Switzerland (CAAS) is the perfect place to start. Learn from experienced chefs, explore global cuisines, and gain the hands-on experience needed to turn your passion for food into a professional future.
Frequently Asked Questions
Can I make a roux without butter?
Yes. Oils such as vegetable, canola, or avocado oil work well, especially for longer cooking times. The important element to keep in mind is choosing a fat that can handle heat without burning.
Can I make half a roux?
You can scale it to any quantity. As long as the ratio remains equal by weight, the result will behave the same.
How to fix a broken roux?
If the mixture separates or becomes uneven, lower the heat and whisk continuously. Adding a small amount of fat can help bring it back together, though prevention through steady heat and stirring is always more reliable.
Interested in studying at CAAS? Download our brochure to learn about our programs!